Upgrading the Enhanced Fluoride Filter
Follow the instructions below to upgrade your Enhanced Fluoride Filter from a three stage to a four stage unit. In addition to the fittings and cartridges sent, you will need a wrench, screw driver, and a small length of teflon plumber's tape.
-
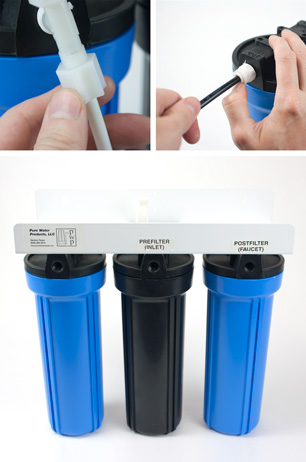
Remove all fittings, tubing and cartridges from the unit. Keep the fittings and tubing handy; for this upgrade, you will need to reuse one of the plug-in elbows and a small length of tubing.
There are two types of fittings on the Enhanced Fluoride Filter: Jaco compression fittings and John Guest-style quick connect fittings.
-
To remove a Jaco fitting, unscrew the compression nut and pull out the tube.
-
To remove a quick connnect fitting, push in the collet (the small bit that surrounds the tube as it enters the fitting) and pull out the tube.
Once everything is removed, unscrew the filter housings and mounting clip from the mounting bracket. Keep these parts handy as well.
-
-
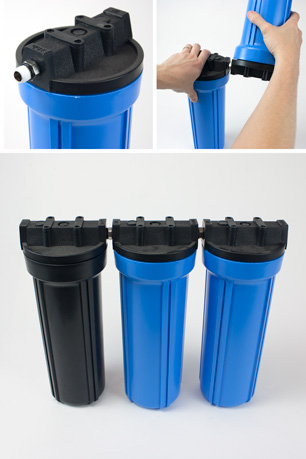
Screw the 1/4" nipples into both ends of one of the filter housings. Wrap a bit of teflon plumber's tape around the threading before installing to ensure leak-free perfomance.
Now, observing the “in” and “out” labels on the housing cap, connect the other two housings.
When they are all connected, attach the straight 1/4" quick connect fitting to the inlet of the first housing, and the 1/4" quick connect elbow to the outlet of the final housing.
-
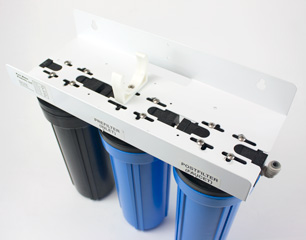
Now, attach the mounting bracket to the housings. It may be helpful to start by placing all the screws loosely before tightening, to ensure correct alignment. The screws will not align exactly with the holes in the bracket, but should align with the larger slots.
Use the longer screw to install the mounting clip in the same spot it was in previously.
-

Attach one of the plug-in elbows to about four or five inches of tubing. Tubing can be cut with scissors; try to get a nice flat cut.
-
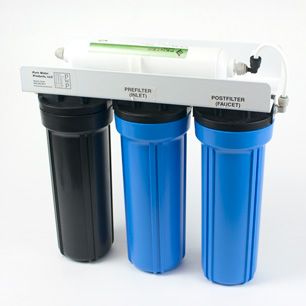
Install the cartridges. The two fluoride cartridges should be installed in the first two housings, followed by the carbon block. The Coconut Shell Carbon/KDF inline filter should be clipped on top of the mounting bracket.
Attach the plug-in elbow to the inline filter, and push the tubing into the quick-connect elbow on the rightmost housing.
The unit is now ready to be reinstalled. Attach the inlet tubing to the left housing, and the the faucet tubing to the inline cartridge. Refer to the Enhanced Fluoride Filter Installation Instructions for help with installation.
Site Index
Filtration Systems
- Aeration for Iron & Sulfide
- Backwashing Filters
(whole house & well units)
- Chlorine & Chemical Injectors
- Countertop Water Filters
- Garden Hose Filters
- Reverse Osmosis, Residential
- Reverse Osmosis, Commercial
- Shower Filters
- Specialty Filters
- Ultraviolet Systems
- Undersink Filters
- Water Softeners
- Whole House Filters
Cartridges
Parts
- Replacement Parts
- Faucets
- Filter Media
- Fittings
- Housings
- O-rings
- Pumps
- Pura UV
- R.O. Parts
- R.O. Tanks
- R.O. Booster Pump
- VIQUA UV