Installing Your Undersink Fluoride Filter
The undersink fluoride unit can be wall mounted under the sink or simply stood in a secure undersink location. Be sure to leave plenty of room so that tubes won't be crimped or harmed by other undersink items.
The unit has both quick connect fittings and the traditional plastic compression (Jaco) connectors. All connections made during installation are with quick connects.
The quick connect fittings supplied with the unit are easy to use. The only tool you you might need is a pair of scissors, in case you want to shorten a tube — tubes can be shorted as desired, but always leave enough tubing to avoid sharp bends and crimps.
To connect a tube: make sure it's cut squarely, then push it into the fitting until you feel it hit bottom. Should you need to remove it, push the small collet (the part that touches the tube) in toward the body of the fitting while pulling the tube out.
Installation Procedure
-
Install the inlet valve to an undersink water source. Normally, the water source is the tube or pipe that takes water up to the cold water side of your sink faucet. Your unit will come with either a saddle valve inlet ket, for installation on a copper tubing water source, or a Max Adapter inlet kit, for use with a flexible water line. Instructions for installation are packaged with the inlet valve kit.
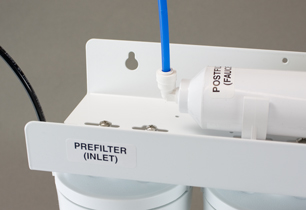
When the inlet valve is installed, push the black tube from the inlet valve into the empty port of the housing on the extreme left, labeled “Prefilter”. See Picture.
-
Now, install the faucet on the sink. Instructions for faucet installation are packaged with the faucet kit. After the faucet is installed, push the blue tube from the faucet into the open fitting of horizontal filter labeled “Post Filter”. See Picture.
Installation is now complete.
Startup
When the unit is installed, open the unit's ledge faucet and leave it locked open. Then turn on the inlet water part way and allow the unit to fill slowly. Watch for leaks. Water will eventually begin to issue from the faucet. Let it run for about 5 minutes, then close the faucet. Now, turn on the inlet valve fully. Check for leaks.
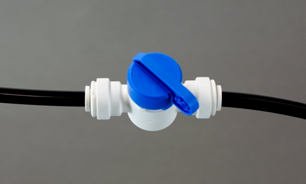
The inlet valve can be adjusted to slow down the flow. Here the valve is adjusted to approximately half open.
You may for a time experience a bit of cloudy water. This is normal; it is the result of air that is still trapped in the unit. It is of no concern — the cloudiness will soon go away.
When the filters have been rinsed, close the ledge faucet and the unit is ready for use.
As a final measure, choose the flow speed of the water from the faucet by adjusting the blue-handled inlet valve installed in the black inlet tube.
Adjust the valve with the faucet open to select a comfortable rate of flow for your home. Remember that, although this unit has double or more the fluoride filtration medium as compared with standard fluoride filters, you can greatly enhance its performance by slowing down the water flow. The slower the flow, the better the fluoride removal capacity of the unit. Ideal flow is less than 1/2 gallon per minute.
Annual Service for this Unit
The four filter cartridges should be changed annually. Pure Water Products will send you a reminder. We have a record of the cartridges you need. The cartridge replacement pack for the unit is our part number FC499. It contains all four cartridges needed.
To service the unit, turn off the inlet water with the blue-handled inlet valve. Then, open the ledge faucet and leave it open while you service the unit. If no water is coming out of the open faucet, you know you have the water off and it's safe to open the filter canisters.
Using the wrench that comes with the unit, open the three vertical filter housings and replace the cartridges. Here's where they go:
-
Left and center vertical white canisters: Fluoride media cartridges.
Important: One end of the cartridge has a round black rubber gasket. This end must face up, toward the cap.
-
Right Vertical Canister: Carbon Block Cartridge.
-
Horizontal Filter: Coconut Shell Carbon/KDF Inline Filter. Observe the orientation before removing the two tubes from the cannister. Remove the tubes by pressing in on the small collet (the part that touches the tube) while pulling out on the tube. Snap the filter out of the clips, and replace it with the new filter. Push the tubes into the fittings of the new filter. Be sure to position the filter so that tubes are not crimped.
Leaving the faucet open, turn the inlet water back on. After a couple of minutes, water will come from the faucet. Rinse the filters thoroughly — at least 5 minutes — and look for leaks.
Do not hesitate to call us if there is a problem or if you have a question.
Site Index
Filtration Systems
- Aeration for Iron & Sulfide
- Backwashing Filters
(whole house & well units)
- Chlorine & Chemical Injectors
- Countertop Water Filters
- Emergency Filters
- Garden Hose Filters
- Reverse Osmosis, Residential
- Reverse Osmosis, Commercial
- Shower Filters
- Specialty Filters
- Ultraviolet Systems
- Undersink Filters
- Water Softeners
- Whole House Filters
Cartridges
Parts
- Replacement Parts
- Faucets
- Filter Media
- Fittings
- Housings
- O-rings
- Pumps
- Pura UV
- R.O. Parts
- R.O. Tanks
- R.O. Booster Pump
- VIQUA UV