Servicing Our Compact Gold Series
& K Series Reverse Osmosis Units
These instructions apply to all units that use disposable, inline, quick connect filter cartridges.
Some are three stage units. These have two filters to replace. Some are 4-stage units. These have three filters to replace. The procedure is the same for both. Some filters may have different markings from the originals. Don't worry. They'll replace the originals fine. It's the same filter in a slightly different package.
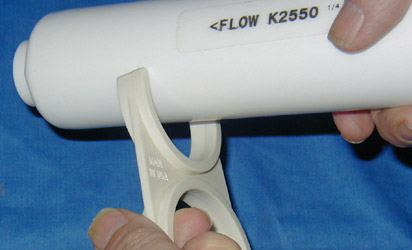
When replacing the filters, observe the flow direction on the filter that is indicated by an arrow. Be sure to place the new filter in the same direction as the old. The filters will slip out of the clips that retain them with a slight pressure. Don't worry about breaking the clip. They're pretty tough.
Three stage units have a prefilter and a postfilter. Simply replace the existing prefilter and postfilter with their counterparts.
Four stage units have a Prefilter 1 and a Prefilter 2, as well as a postfilter. Determine the position of Prefilter 1 by observing where the water enters the unit. Prefilter 1 is the inlet filter. Find where your unit gets its water from the cold water line of your house plumbing. The filter through which water enters the unit is Prefilter 1. Trace the tube that leaves the Out port of prefilter 1 to the next filter filter. This is Prefilter 2. The Postfilter will be identical to the original.
That being said, service the unit by carrying out the following steps (This is a step-by-step process. You don't have to follow this exact order, but it will be easier if you do):
1. First, check the TDS (Total Dissolved Solids) level of the unit if you have a tester. Take a sample from the spigot of your RO unit. This is a test of the reverse osmosis membrane, not of the carbon filters. It measures ppm (parts per million, which is the same as mgl, or milligrams per liter.) The unit's product water should be about 1/10 the TDS of the tap water. For example, if your tap water has 500 ppm total dissolve solids, your RO unit should be running at 50 or lower. If you don't have a tester, take a guess. If the water tastes good, the membrane is probably OK. Membrane life depends on lots of variables, but a good RO membrane should last from two or three years to five or six. Call (888) 382-3814 for other suggestions if in doubt.
2. Assuming the membrane is OK, turn off the inlet water at the inlet valve to the unit. Turn off the tank valve at the top of the storage tank. Open the ledge faucet of the unit and lock it open. Wait a few seconds for pressure to go down. When no water is dripping from the ledge faucet, it's safe to proceed.
3. Get the unit in a comfortable position (comfortable for you — don't worry about the unit). It's a good idea to put a towel under the unit. With inline units, you won't spill much water, but you might spill a little.
4. Now, replace the two or three (depending on your unit) inline filters. Do your best to match the originals, but if you don't get them back in exactly the original sequence, the world won't end. If you get a pre-filter where the post-filter goes, the unit will run fine. But be sure that you retain the original flow pattern. Observe the directional arrow on the filter. The easy way is to replace one filter at a time. Take one off and put its replacement on immediately, the proceed to the next.
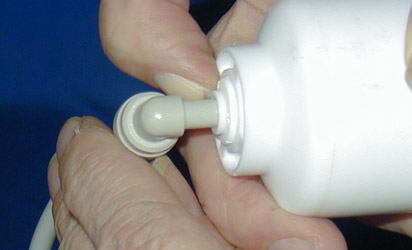
Change by removing the elbows from the fittings. (See the picture.) Follow the attached John Guest instructions. Release by pushing in on the collet and simultaneously removing the elbow. Insert the elbow into the new filter and push in unit you feel the elbow hit bottom.
The filters will slip in and out of the clips that retain them with a bit of force.
5. Reconnect any tubing you have removed. Slowly open the inlet valve and let water into the unit. Check for leaks. It is normal to hear lots of gurgling and air escaping down the drain. Next, with the ledge faucet open, open the valve on top of the tank. Let the tank drain completely. It may take several minutes. It will finally become a fast drip. The drip is the unit's production — the amount of water that it produces. It should be a fast drip or a small stream.
6. Now, pick up the storage tank. If it is empty, very light, close the faucet and let the tank refill. If it still has water in it &mdash and this is usually the case &mdash attach a bicycle pump to the air valve on the tank. (It's on top of some tanks, on the bottom of others, and sometimes on the side.. You'll have look for it. It looks like an stem where you add air to your automobile's tires.) With the faucet still open, pump air into the tank. Water will start to leave the tank through the open ledge faucet. Continue to pump air into the tank slowly and steadily until all water is out of it. It will return to a fast drip. Try to leave about 7 pounds of pressure in the empty tank. If you don't have a low-pressure gauge, guess. The exact amount isn't that critical. Don't over-air the tank, however, because you won't be gaining more pressure; you'll just be leaving less room in the tank for water.
7. When the tank is aired, close the faucet and let the unit refill. You're through. You'll have enough water to use in a few minutes, but it may take a few hours for the tank to fill completely.
Don't hesitate to call for help. (888) 382-3814. Or email pwp@purewaterproducts.com
Site Index
Filtration Systems
- Aeration for Iron & Sulfide
- Backwashing Filters
(whole house & well units)
- Chlorine & Chemical Injectors
- Countertop Water Filters
- Garden Hose Filters
- Reverse Osmosis, Residential
- Reverse Osmosis, Commercial
- Shower Filters
- Specialty Filters
- Ultraviolet Systems
- Undersink Filters
- Water Softeners
- Whole House Filters
Cartridges
Parts
- Replacement Parts
- Faucets
- Filter Media
- Fittings
- Housings
- O-rings
- Pumps
- Pura UV
- R.O. Parts
- R.O. Tanks
- R.O. Booster Pump
- VIQUA UV