Smart Vent Instructions
Note: Air and water will discharge from vent head. Proper drainage required.
-
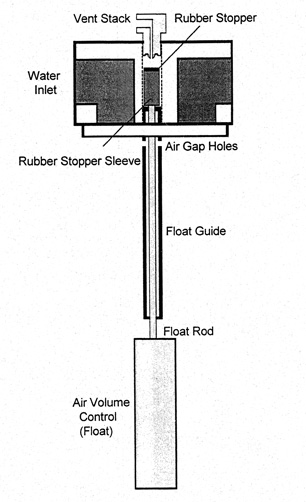
Clean end of 1/2" cpvc pipe that has holes drilled in the end. Clean 1/2" hole in the base of PVC head. Glue pipe into base of head.
-
Glue rubber stopper sleeve onto PVC float rod. Use one end of cotton swab to clean and the other to glue.
-
Insert Float Rod down through the top of the PVC head and thread Float onto Float Rod. Be sure top of stopper is horizontal.
-
Insert wedge shape rubber stopper into sleeve.
-
Wrap Teflon on threads of the Vent Stack and thread into top of PVC head.
-
Wrap Teflon on threads of 1/4" X 3/8" compression fitting and thread into Vent Stack.
-
Lube large o-ring on base of PVC head. Install PVC head on aeration tank.
-
Smart vent head requires drainage.
Air and water will discharge from vent stack. Run 3/8" tubing (not included) from vent stack to appropriate drain or air gap. Drain should immediately run down from head. A minimum of 1/4" per foot slope is needed in order to provide gravity drainage of discharge tube.
-
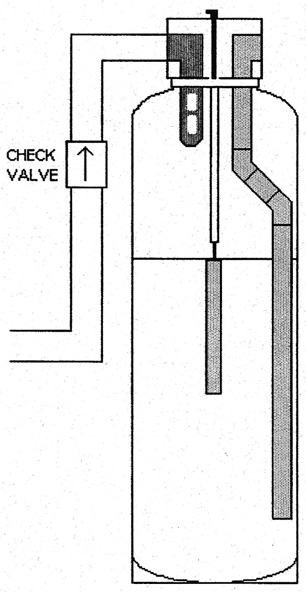
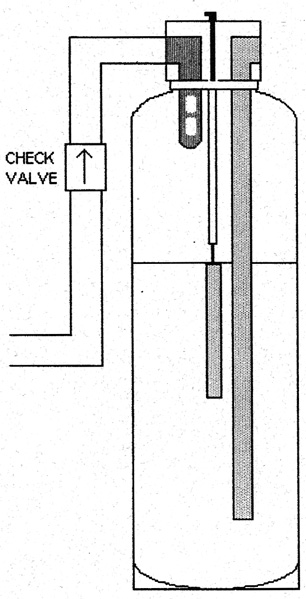
On high levels of iron and hydrogen sulfide, it may be necessary to install two (2) 3/4" 45 elbows on the riser tube to allow movement of the flotation device. See trouble-shooting guide below.
-
Adjust air regulator valve on Air Pump to the maximum line pressure or cut off pressure of the well pump. This will allow air to be introduced during complete pump cycle.
Trouble Shooting
Two possible problems may occur with the Smart Vent, namely:
- It is not releasing excess air (causing too much air to enter the system), or
- It is releasing too much air. Please read the solutions below. If smart vent is operating properly, check air pump trouble shooting guide for additional solutions.
Too much air, spitting and sputtering:
If the excess air is trapped in the vent tank, it becomes air bound and the excess air is carried over to the filter tank and into the plumbing fixtures. If this happens, inspect the following:
-
Check the small hole in the vent stack where air is expelled, for any obstruction. Also check the vent line for blockage such as ice, snow, dirt or kinks in the line.
-
Remove the vent head and inspect the float. When iron is in the water, it will precipitate around the float and riser tube and “bridge” or bind up the free movement of the float. If that is the case, it will be necessary to modify the riser tube, which will provide space for easy movement (see picture). Modification is made by installing two 3/4" PVC 45 elbows on the riser tube. Cut the riser seven inches (7") from the top. Glue the two elbows with a short riser piece in between. This will successfully move the riser away from the float several inches.
It will be necessary to rotate the modified riser tube toward the center of the PVC head in order to insert the unit back into the tank. After inserting the unit, hold the PVC head in one hand and grasp the riser near the PVC head and rotate riser away from the center of the PVC head.
-
If the riser is not securely fastened in the PVC head, air will escape into filters or home. It may be necessary to replace o-ring or glue riser into the head. It cannot be glued if riser needs to rotate when modified for high iron situations.
Water logged vent tank, little or no air bubbles:
Four possible causes:
-
Improper installation of 1" check valve. The check valve needs to be installed in a vertical position with the arrow facing up. If the check valve is installed horizontally or if the supply line is overhead and the check valve is installed with the arrow facing down, air will back flow from the vent tank.
For an overhead supply line, it will be necessary to run the line two or three feet below the aeration head and return the line up. At this point, install the check valve in a vertical position.
-
Rubber stopper not sealing. If the rubber end is lose, then reconnect by pressing and twisting the rubber into the sleeve. If the rubber end is a damaged, call for replacemet. Continuous water leakage to drain may also occur if the stopper is leaking.
-
When retrofitting smart vent on a standard air pump vent head, it will be necessary to trim 2" of the bottom of the vent distributor (1/2" cpvc pipe). This now becomes the smart vent float guide. This will allow the float to rise and fall without obstruction. Be sure to clean vent distributor if iron is present.
-
Float water logged. Will need to replaced.
Site Index
Filtration Systems
- Aeration for Iron & Sulfide
- Backwashing Filters
(whole house & well units)
- Chlorine & Chemical Injectors
- Countertop Water Filters
- Garden Hose Filters
- Reverse Osmosis, Residential
- Reverse Osmosis, Commercial
- Shower Filters
- Specialty Filters
- Ultraviolet Systems
- Undersink Filters
- Water Softeners
- Whole House Filters
Cartridges
Parts
- Replacement Parts
- Faucets
- Filter Media
- Fittings
- Housings
- O-rings
- Pumps
- Pura UV
- R.O. Parts
- R.O. Tanks
- R.O. Booster Pump
- VIQUA UV