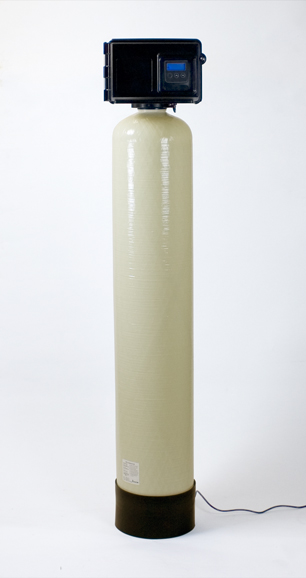
Programming and Start-Up
for our Single Tank Passive Aerator
The following is a fairly complete description of how to prepare and start the filter, but don't hesitate to call if there are questions.
Loading the Media
Most of our Single Tank Aeration units are built with Vortech tanks, so the riser tube is preinstalled in the tank.
-
Cover the top of the riser tube with tape or a small plastic bag so media can't get in.
-
Use the funnel to pour the media into the tank.
Most units contain a single filter medium. If the unit has both Birm and Centaur carbon, first put in the Birm, then put in the Centaur carbon.
The tank should be about 2/3 full when all the media has been loaded.
Installing the Diffuser
The small plastic cone packed with the instructions is a baffling device to cause water to fan out as it falls through the air pocket in the top of the tank. Install it after the media is in the tank.
-
Just push it down the riser tube four or five inches. The large end goes down, so that water falls on top like an umbrella.
Important Note: This is an optional item, and the unit will work fine if you don't install it. When media is changed in the future, this optional diffuser may make emptying the tank more difficult.
Screwing the Head onto the Tank
-
O-rings should be pre-lubed. If they are dry, we suggest that you lube them lightly with silicone grease. (This applies to both the O-rings in the center hole of the control valve and the large O-ring that makes the seal between the tank and the control valve.)
-
The riser goes into the center hole of the valve bottom. Just screw it on snug. No tools needed.
Hooking to Plumbing
The bypass valve is already installed on the unit, as is the “check valve” in the inlet port. From the back, water enters on the left side. (See the arrow on the bypass valve.)
-
Hook the In and Out ports of the bypass valve to your home plumbing.
-
Use the 1/2" flexible tubing provided to establish a drain for the backwash and rinse water. The drain tube goes on the white barbed fitting. Adding a hose clamp to secure it is a good idea.
The drain water is simply water, so you can run it on the lawn if you wish, but it may leave iron stains on a sidewalk or driveway. If you pipe the drain water into a sewage drain, you must follow your local plumbing code for the connection.
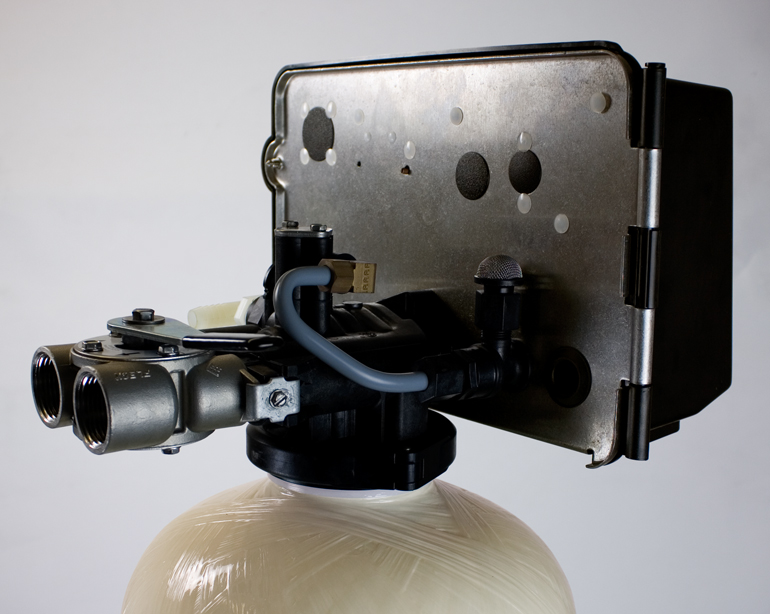
Unit comes with bypass installed.
Program the Control Valve
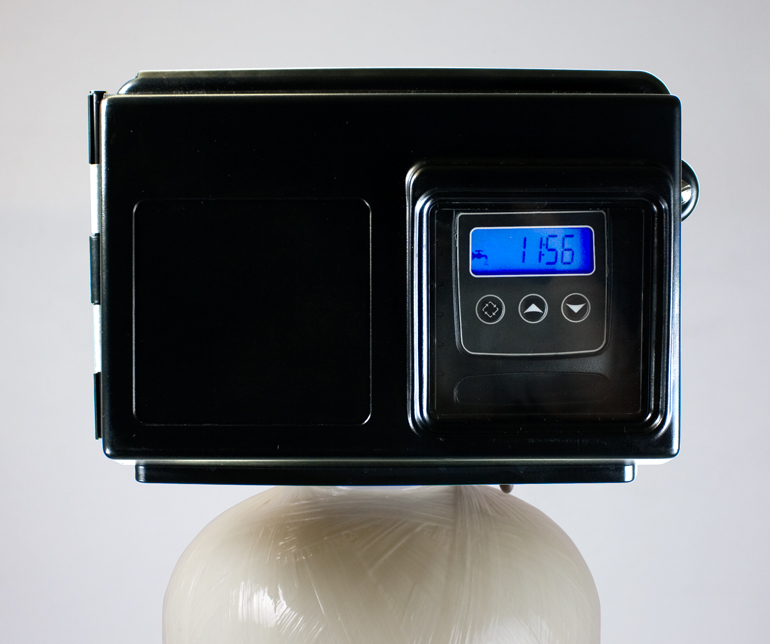
If we programmed your Single Tank Passive Aeration unit, simply set the time and begin use.
Note: The Fleck SXT is normally used to control water softeners, so the manual that comes with the unit will have some information that doesn't apply to your unit.
If Pure Water Products has programmed the valve before shipping it, much of the information below will not apply. You can just plug the unit in, set the time to the actual time of day, and start using it. If it is not programmed by us, here’s what you’ll encounter:
-
When you plug the valve in, the display will alternate between the time of day and the number 3. The 3 is the days before the next regeneration. It can (and in most cases should) be changed by going into the master programming mode, as described in the valve-maker's manual.
The feature you would change is the “Day Override” (DO on the display.) The DO should be set to 2 or 1 usually, depending on the severity of the water problem and the amount of water used. Some trial and error may be needed. It should never be set higher than the default number, 3.
-
You can set time of day or enter the master programming mode by following the instructions on page 5. (It's usually easier to do this before you install the valve. If you unplug the valve, it will remember your settings, but the time of day will have to be reset.)
Here's what you'll see in the master programming mode. Leave everything that isn't mentioned here at the default setting.
Items you might change:
-
Day Override (DO). As stated, set to 1, 2, or 3 only. This determines the regeneration frequency.
-
Regeneration Time (RT). Set to the time of day you want the regeneration to take place. The default is usually 12:00 AM.
-
Regeneration Cycle Step Times. This section contains most of the important variables that you might want to change. They don't necessarily appear in this order:
-
Backwash (BW). Default is 14 minutes. This controls the time in minutes that the backwash will last. You can shorten it, but if there's iron in the water you shouldn't shorten it too much.
-
Brine Draw (BD). With your unit this is actually the Air Draw. Default is 40 minutes. This is the time that fresh air is being taken in and old air and the water in the tank are expelled. It can be shortened, but the default is probably a good number.
Note: Water will run to drain at the rate of about 1/2 gallon per minute during this function. That's normal and necessary.
-
Rapid Rinse (RR). Default is one minute. We suggest leaving it at default.
-
Brine Refill (BR). Default is 0 and it should be left there. (This is a water softener function that doesn't apply to your unit.)
-
To exit master programming and save settings, press the extra cycle button.
-
Startup
Everyone who sells a water filter has different startup instructions for new filters. Here's a good plan for this one:
-
When the unit is installed, and the main water valve is still off, put the bypass valve into service position and leave the filter valve itself in service mode (faucet is showing on the display).
-
Open the nearest faucet downstream of the filter, and turn on the water at the main valve about half way. Let the tank fill very slowly so that the air can escape from the open faucet.
-
When the tank is full, turn off the water and allow the media to soak for 30 minutes.
-
Close the open faucet. Then, with the main inlet valve still only half open, begin a regeneration cycle. To do this, press and hold the extra cycle button for 5 seconds. This will begin the backwash phase. Let the unit backwash slowly and watch for excessive media loss. Gradually increase the water flow until the inlet valve is wide open. Let the valve take it from there.
-
It will go through the backwash, air draw, and rapid rinse cycles, then return to service position. Now, open the nearest faucet and let water run until it is very clear and essentially free of air. Close the faucet and start using the water.
It is normal for the water to be a little cloudy. This will get better. Cloudiness is air—nothing to worry about. If you follow these instructions, you should get little media in your service lines.
Site Index
Filtration Systems
- Aeration for Iron & Sulfide
- Backwashing Filters
(whole house & well units)
- Chlorine & Chemical Injectors
- Countertop Water Filters
- Garden Hose Filters
- Reverse Osmosis, Residential
- Reverse Osmosis, Commercial
- Shower Filters
- Specialty Filters
- Ultraviolet Systems
- Undersink Filters
- Water Softeners
- Whole House Filters
Cartridges
Parts
- Replacement Parts
- Faucets
- Filter Media
- Fittings
- Housings
- O-rings
- Pumps
- Pura UV
- R.O. Parts
- R.O. Tanks
- R.O. Booster Pump
- VIQUA UV