Installing Your “Classic”
Enhanced Undersink Fluoride Filter
These instructions are for units purchased prior to October, 2014. For current units, see updated instructions.
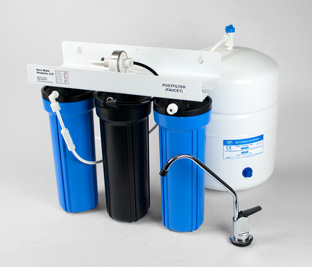
The undersink fluoride unit can be wall mounted under the sink or simply stood in a secure undersink location. Be sure to leave plenty of room so that tubes won't be crimped or harmed by other undersink items.
The unit has both quick connect fittings and the traditional plastic compression (Jaco) connectors. All connections made during installation are with quick connects.
The quick connect fittings supplied with the unit are easy to use. The only tool you you might need is a pair of scissors, in case you want to shorten a tube — tubes can be shorted as desired, but always leave enough tubing to avoid sharp bends and crimps. To connect a tube: make sure it's cut squarely, then simply push it into the fitting until you feel it hit bottom. Should you need to remove it, push the small collet (the part that touches the tube) in toward the body of the fitting while pulling the tube out.
Installation Procedure
-
Install the inlet valve. Your unit may have a saddle valve, for installation on copper tubing, or a Max Adapter, for use with a flexible water line. Instructions for installation are packaged with the inlet valve kit. When the inlet valve is installed, push the tube from the inlet valve into the empty port of the pressure regulator located on the very top of the unit. The valve has four ports. Three are already filled. The empty one is the where the water to be treated enters the unit. You can use the plug-in elbow provided, or simply push the black inlet tube into the pressure regulator.
-
Install the faucet on the sink. Instructions are packaged with the faucet kit. Push the tube from the faucet into the open fitting of blue housing marked Post Filter Outlet.
-
When the inlet valve and faucet are connected, connect the storage tank to the unit.
First, install the blue-handled shutoff valve on top of the storage tank. The threaded tank port is pre-taped with Teflon tape. Screw the valve onto the tank a few turns, but don't over-tighten.
Now, connect the white tube that comes out of the left side of the filtration unit into the blue-handled valve on top of the tank. You can trim the tube to the length you need, but avoid tight bends and crimps. It's often a good idea to leave the tube long, in case you want to move the tank at a later date.
The tank can stand or it can lie on its side if space is an issue. The cradle included with the tank is to hold it in place for on-side mounting.
This completes the installation. The tank should arrive pre-aired, so there is no need to add any air to it.
Startup
When the unit is installed and the tank is connected, open the unit's ledge faucet and leave it locked open. Then, turn the blue inlet valve part way and allow the unit to fill slowly. Watch for leaks. A small stream of water will eventually begin to issue from the faucet. Let it run for about 5 minutes, then close the faucet. Now, turn on the inlet valve fully. Check for leaks.
The valve on top of the storage tank should be open. When the ledge faucet is closed, water will begin to collect in the storage tank. Allow four or five minutes for the tank to fill, then lock the faucet open and let the water run to drain until it returns again to a small stream. Repeat this process, then close the faucet and let the tank fill. Water now is ready for consumption and you can start using the unit.
Note: You may for a time experience a bit of cloudy water. This is normal; it is the result of air that is still trapped in the unit. It is of no concern — the cloudiness will soon go away.
The three filter cartridges should be changed annually. Pure Water Products will send you a reminder. We have a record of the cartridges you need. The standard cartridge pack for the unit is our part number FC998. It contains all three cartridges needed.
Site Index
Filtration Systems
- Aeration for Iron & Sulfide
- Backwashing Filters
(whole house & well units)
- Chlorine & Chemical Injectors
- Countertop Water Filters
- Garden Hose Filters
- Reverse Osmosis, Residential
- Reverse Osmosis, Commercial
- Shower Filters
- Specialty Filters
- Ultraviolet Systems
- Undersink Filters
- Water Softeners
- Whole House Filters
Cartridges
Parts
- Replacement Parts
- Faucets
- Filter Media
- Fittings
- Housings
- O-rings
- Pumps
- Pura UV
- R.O. Parts
- R.O. Tanks
- R.O. Booster Pump
- VIQUA UV