Installing Cartridge-Style Whole House Filters
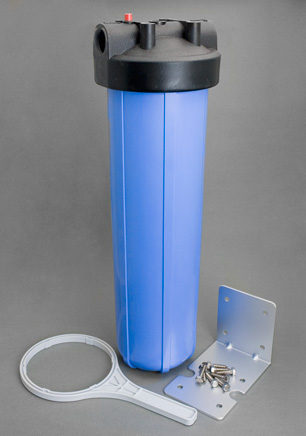
The unit is not connected to its bracket to allow the installer to choose the flow direction. Observe the flow pattern indicated on the filter cap, then attach the filter to the bracket to meet the needs of your installation.
-
Install on an incoming water line before the hot water heater in a place where the filter can be protected from freezing and from direct sunlight.
-
For best results, install with a standard 3-valve plumbing by-pass so the that filter can be by-passed for lawn watering or other high-usage activities for which filtered water is not necessary. If no by-pass is desired, before and after valves will facilitate cartridge changes but are not absolutely necessary.
-
Leave at least 4 or 5 inches clearance at bottom to allow for cartridge change.
-
The filter can be mounted in any direction, including sideways or upside down. Keep in mind, however, that cartridge changes for upside-down or sideways mounted filters can be messy and clumsy.
-
Since filters are installed to many different water line sizes, standard hardware store bushings may be needed to adapt to your pipe size. PVC installation is preferred, but the filter will work fine with metal. A connecting pipe nipple is included for double filter model (Style C), but a longer or shorter version can be substituted if desired. The two parts of Style C can, of course, be mounted on separate water lines if desired. (Note: Some versions of Style C are shipped with a double bracket rather than two single brackets. This, of course, limits the installers options. With the double bracket, the two vessels must be mounted together.)
Initial Startup
After startup, the filter should be rinsed for a few minutes before drinking the water. This is especially true of carbon filters. Because new carbon releases large amounts of air when water first flows through it, a certain amount of noise and cloudiness in the water is normal. Cloudiness is air trapped in the water and will go away if the water is allowed to stand in a glass. After the filter has been rinsed for a few minutes, drink it without concern even if cloudiness persists.
Cartridge Replacement
Cartridge change is simple:
-
Turn off the incoming water before the filter.
-
Relieve pressure by pressing the red pressure release button on the filter cap or by opening a downstream faucet.
-
Remove the filter sump with the wrench provided and replace the filter cartridge. There is no “up” or “down” on the cartridge. Be sure that the end gaskets on carbon cartridges remain in place during installation.
It's a good idea to lubricate the black o-ring with silicone grease while you have it open.
-
Replace the sump and tighten snugly with the wrench. Turn on the water and check for leaks.
Sediment cartridges are usually changed upon need — when flow or aesthetics indicate that the cartridge's capacity has been reached.
The standard carbon cartridge is a MatriKX CTO extruded carbon block. Life may vary according to the amount of chlorine in your water — you can verify the chlorine removal life of your filter with a simple chlorine test kit available at pool or pet stores. Its life can also be shortened by plugging if your water has more than the average amount of particulate — suspended objects or pipe rust that will eventually block the flow of incoming water.
A good rule of thumb for cartridge change in most cases is to change the cartridge once a year. Your situation might vary some because of usage, chlorine content, or high particulate content. In any event, we will send you a cartridge change reminder a year from the date of initial purchase (or purchase of the last replacement cartridge). If you prefer a different reminder interval, let us know.
Site Index
Filtration Systems
- Aeration for Iron & Sulfide
- Backwashing Filters
(whole house & well units)
- Chlorine & Chemical Injectors
- Countertop Water Filters
- Garden Hose Filters
- Reverse Osmosis, Residential
- Reverse Osmosis, Commercial
- Shower Filters
- Specialty Filters
- Ultraviolet Systems
- Undersink Filters
- Water Softeners
- Whole House Filters
Cartridges
Parts
- Replacement Parts
- Faucets
- Filter Media
- Fittings
- Housings
- O-rings
- Pumps
- Pura UV
- R.O. Parts
- R.O. Tanks
- R.O. Booster Pump
- VIQUA UV