Installing Your Undersink Filter
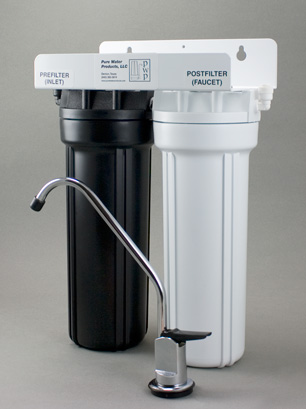
First, hang the unit from the undersink wall, or simply stand the unit in a secure undersink location. Then:
-
Install the inlet valve. Your unit may have a MAX Adapter, for use with flexible connectors, or a saddle valve, for installation on copper pipe. Instructions are included for the style that is supplied with your unit.
Push the tube from the inlet valve into the empty port of the black filter housing.
-
Install the faucet on the sink, following included instructions.
Push the tube from the faucet into the open fitting of white filter housing.
-
Open the ledge faucet and leave it on. (Faucets with up/down handles lock open by pulling the handle up.) Turn on the water to the filter with the blue-handled inlet valve.
Let the unit fill and watch for leaks. Allow water to run from the faucet for four or five minutes to rinse the filters.
After the unit is rinsed, it's ready for operation. Water may appear cloudy, or the faucet may drip for a few hours after installation. Don't worry. It's only air trapped in the filters, and will work itself out. The water can be used at any time.
Site Index
Filtration Systems
- Aeration for Iron & Sulfide
- Backwashing Filters
(whole house & well units)
- Chlorine & Chemical Injectors
- Countertop Water Filters
- Garden Hose Filters
- Reverse Osmosis, Residential
- Reverse Osmosis, Commercial
- Shower Filters
- Specialty Filters
- Ultraviolet Systems
- Undersink Filters
- Water Softeners
- Whole House Filters
Cartridges
Parts
- Replacement Parts
- Faucets
- Filter Media
- Fittings
- Housings
- O-rings
- Pumps
- Pura UV
- R.O. Parts
- R.O. Tanks
- R.O. Booster Pump
- VIQUA UV