Installing the Membrane
in your Reverse Osmosis Unit
The reverse osmosis membrane for your unit is packed in a special bag to assure long shelf life. It should be installed shortly before you plan to install and start up the unit.
To install:
-
Remove the tube that enters the cap end of the membrane housing by pressing in on the collet of the fitting and pulling out the tube (Fig. 1). Then remove the membrane housing cap. It screws off counterclockwise.
-
When the cap is off the housing, cut or tear the back end off of the sealed bag that holds the membrane. Cut off the end of the bag opposite the membrane stem with two black o-rings. Then, avoiding touching the membrane with your hands, grasp the back stem of the membrane (the end opposite the stem with the two o-rings) with pliers, and pull the membrane from the bag. (Fig. 2)
Holding the membrane with pliers, put it under a water tap. This isn't to rinse the membrane but to wet the o-rings and the rear skirt for lubrication so it will slide easily into the housing.
-
When the membrane is wet, slide it into the membrane housing on the RO unit (Fig. 3), still holding it with pliers. It needs to slip into a slot at the front end of the housing. The best way is to push it to an easy stopping place, then twist and push with the pliers. You'll feel it slide into its slot. (Fig. 4)
-
Replace the cap and the tube and you're ready to go.
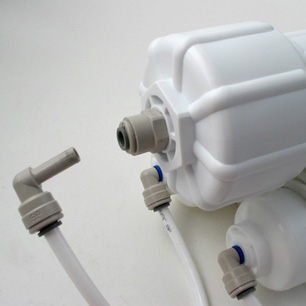 Fig. 1 Removing the fitting
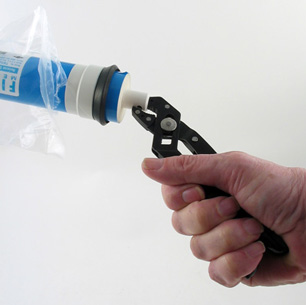 Fig. 2 : Gripping the RO membrane
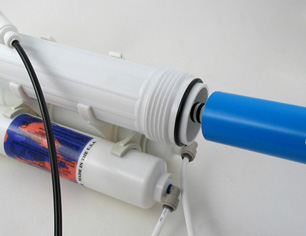 Fig. 3 : Inserting the RO membrane
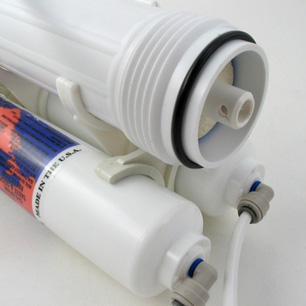 Fig. 4 : The fully installed membrane
Site Index
Filtration Systems
- Aeration for Iron & Sulfide
- Backwashing Filters
(whole house & well units)
- Chlorine & Chemical Injectors
- Countertop Water Filters
- Garden Hose Filters
- Reverse Osmosis, Residential
- Reverse Osmosis, Commercial
- Shower Filters
- Specialty Filters
- Ultraviolet Systems
- Undersink Filters
- Water Softeners
- Whole House Filters
Cartridges
Parts
- Replacement Parts
- Faucets
- Filter Media
- Fittings
- Housings
- O-rings
- Pumps
- Pura UV
- R.O. Parts
- R.O. Tanks
- R.O. Booster Pump
- VIQUA UV