Installing and Breaking In a
Countertop Reverse Osmosis Unit
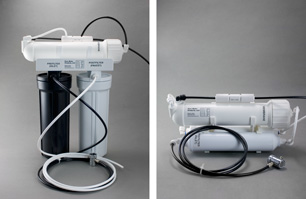
Countertop reverse osmosis units come fully assembled except for inlet and outlet tubing.
To attach a tube, just push it into the fitting until you feel it hit bottom and you're done. The black inlet tube, which will supply the unit with water, goes into the port that is marked “Prefilter Inlet” (for a Style A unit, this is the black vertical housing). The white outlet tube, which delivers the water you're going to drink, goes into the port marked “Postfilter Outlet” (the white housing on a Style A). A third, black tube is already installed — this is the drain tube. It's usually just dropped into the sink or any other convenient drain.
Countertop units use a standard faucet diverter as the source for water. To install the diverter, just remove the aerator from your sink faucet and screw on the diverter valve in its place. If it doesn't fit your faucet, use one of the adapters provided. If that doesn't work, call us, or take the problem to a good hardware store.
To operate the diverter valve, turn on the cold water of your regular sink faucet. Pull out the small knob on the diverter. This will divert water from the sink to your reverse osmosis unit. When you turn off the water, the knob will pop back in (or, for some units, the knob is manually pushed in) and you'll have use of your regular sink faucet.
Startup
Once the tubing is installed and the inlet valve is connected to your faucet, send water into the unit via the diverter valve. Expect some hissing and gurgling on the initial startup as air is expelled from the unit. Water will start coming from the black drain tube after a few seconds — send this to the sink or another convenient drain. After a few minutes, water will begin to come from the white product water tube attached to the “Postfilter Outlet” port. This is the water that you will eventually save for drinking, but for the first two hours of operation, allow it to run to the drain, allowing the membrane and postfilter time to rinse.
After two hours of continuous operation, you can begin to collect the water in a container. It may still be a bit cloudy because of air that hasn't fully worked its way out of the system, but you can begin to use the water at this point.
Operation
The two-hour rinse described above is for first-time use or after servicing the unit only. After the break-in, just turn on the water, let it run to drain for about a minute to clear the water that's been sitting in the postfilter, then start catching the water.
Countertop units, in theory, but only in theory, make water at the rate of about 2 gallons per hour. There are many variables that affect RO performance. The 50 gallon per day rating for the membrane, for example, was made with the assumption of a water temperature of 77 degrees F. Production goes up on warmer water and down, dramatically, on colder water. Other variables are the TDS (total dissolved solids) of the water, hardness, and water pressure. As the membrane ages and as the prefilter gets dirtier, production will normally go down. The 50 gpd production is a theory, not a promise. Fifty gallons per day is about two gallons per hour.
RO thrives on use. If you'll use the unit often, the membrane will last longer and work better.
Changing the Cartridges
For normal use, we recommend an annual change of the two carbon filters.
To change the cartridges on Style A, use the filter wrench to open the two vertical cannisters. Remove the old cartridges and replace them with new ones. Most units use radial flow cartridges with no “up” or “down”.
Now lubricate the O-rings in the vessels lightly — silicone grease is the ideal lubricant. Be sure that the O-rings are properly seated in their grooves, then screw the vessel sumps back onto their caps. Tighten snugly, but don't overdo it. (Over-tightening can damage O-rings.)
To change the cartridges on Style B, remove the old filters one at a time and replace — the quick connect fittings release by pushing in on the collet with your thumb and pulling out on the tube (or “plug-in elbow”) simultaneously.
Proceed slowly, one cartridge at a time, and pay close attention so you won't forget which cartridge goes where. The cartridges are not identical, and the filters have a specific flow direction (indicated on the filter) that must be followed. So be sure you put them in their right places and in the correct orientation.
For both styles, when the cartridges are replaced, restart the unit and allow it to run to drain for at least an hour before collecting the water. If you change the membrane, do a two-hour rinse.
Maintenance and service
Changing the Membrane
The membrane is best monitored with a TDS tester and changed as needed rather than on a routine schedule — membranes sometimes last for many years. If you have a TDS tester, change the membrane when the RO water TDS measures at 15% to 20% that of your tap water. (For example, if your tap water reads 200 ppm, start thinking about changing your membrane if the TDS reading of the RO unit gets higher than 30.) Always take the TDS reading before you change the filter cartridges — new cartridges will corrupt the reading.
If you don't have a TDS tester, you can assume that the membrane needs to be changed about every three years, or if the water starts tasting bad. Don't hesitate to call us for advice if you're in doubt.
-
Remove the tube that enters the cap end of the membrane housing by pressing in on the collet of the fitting and pulling out the tube (Fig. 1). Then remove the membrane housing cap. It screws off counterclockwise.
-
When the cap is off the housing, cut or tear the back end off of the sealed bag that holds the membrane. Cut off the end of the bag opposite the membrane stem with two black o-rings. Then, avoiding touching the membrane with your hands, grasp the back stem of the membrane (the end opposite the stem with the two o-rings) with pliers, and pull the membrane from the bag. (Fig. 2)
Holding the membrane with pliers, put it under a water tap. This isn't to rinse the membrane but to wet the o-rings and the rear skirt for lubrication so it will slide easily into the housing.
-
When the membrane is wet, slide it into the membrane housing on the RO unit (Fig. 3), still holding it with pliers. It needs to slip into a slot at the front end of the housing. The best way is to push it to an easy stopping place, then twist and push with the pliers. You'll feel it slide into its slot. (Fig. 4)
-
Replace the cap and the tube and you're ready to go.
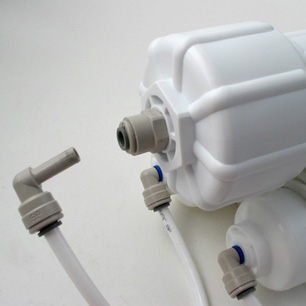 Fig. 1 : Removing the fitting
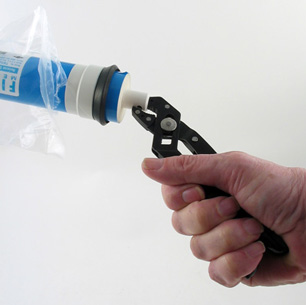 Fig. 2 : Gripping the RO membrane
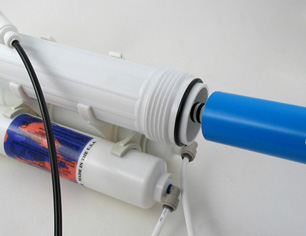 Fig. 3 : Inserting the RO membrane
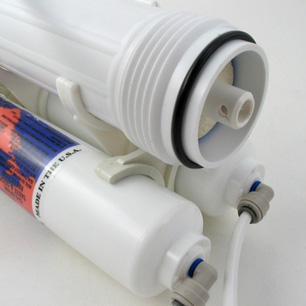 Fig. 4 : The fully installed membrane
Site Index
Filtration Systems
- Aeration for Iron & Sulfide
- Backwashing Filters
(whole house & well units)
- Chlorine & Chemical Injectors
- Countertop Water Filters
- Garden Hose Filters
- Reverse Osmosis, Residential
- Reverse Osmosis, Commercial
- Shower Filters
- Specialty Filters
- Ultraviolet Systems
- Undersink Filters
- Water Softeners
- Whole House Filters
Cartridges
Parts
- Replacement Parts
- Faucets
- Filter Media
- Fittings
- Housings
- O-rings
- Pumps
- Pura UV
- R.O. Parts
- R.O. Tanks
- R.O. Booster Pump
- VIQUA UV