Installing a Pure Water Products
Add-on Undersink Filter
Quick connect fittings work with ordinary plastic water filter tubing, with polybutylene, or with copper. (Installation with copper can be tricky. Be sure you have a good, straight piece of tubing to insert.)
To install with an existing filter, first determine if the add-on filter is to go before or after your existing filter. In general, sediment and fluoride reduction filters go in front of your existing unit, and remineralizing (calcite) or ceramic filters follow.
If you are using a mounting bracket, install the bracket on the filter so that the filter will point in the direction that will ensure easy installation, observing the “In” and “Out” ports on the filter. Mount the bracket on the wall under the sink.
If no bracket is used, stand the filter in its approximate location, then:
-
Turn off the water supply.
-
Cut the tubing in an appropriate location so that the ends can be pushed into the filter. Be sure to get a good, square cut.
-
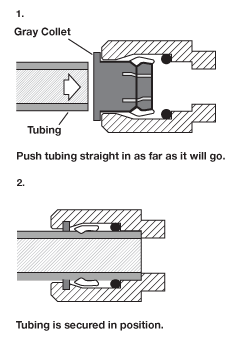
Insert the ends of the tube into the quick connect fittings until you feel the fitting hit bottom. The fitting is now secure. Should you need to release it, push in on the small collet (the part that touches the tube) and at the same time pull the tube out.
Install the filter cartridge (if it isn't already installed). Don't overtighten — remember, you'll have to change the filter later.
When the filter is installed, open the ledge faucet, turn on the water and allow the new filter to rinse for several minutes. Check for leaks.
Site Index
Filtration Systems
- Aeration for Iron & Sulfide
- Backwashing Filters
(whole house & well units)
- Chlorine & Chemical Injectors
- Countertop Water Filters
- Garden Hose Filters
- Reverse Osmosis, Residential
- Reverse Osmosis, Commercial
- Shower Filters
- Specialty Filters
- Ultraviolet Systems
- Undersink Filters
- Water Softeners
- Whole House Filters
Cartridges
Parts
- Replacement Parts
- Faucets
- Filter Media
- Fittings
- Housings
- O-rings
- Pumps
- Pura UV
- R.O. Parts
- R.O. Tanks
- R.O. Booster Pump
- VIQUA UV