Installing the 5600 or 2510 Water Softener
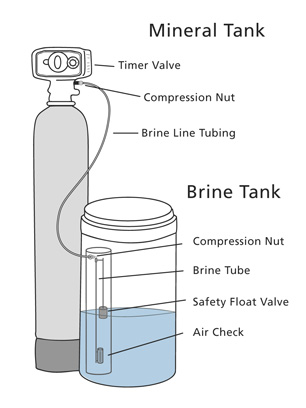 Fig. 1
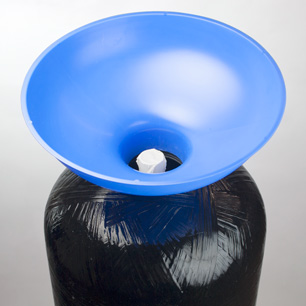 Fig. 2 — Be sure the tube is pushed to all the way to the bottom.
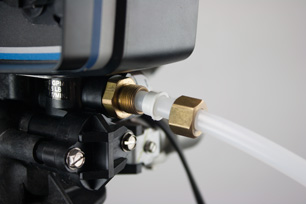 Fig. 3
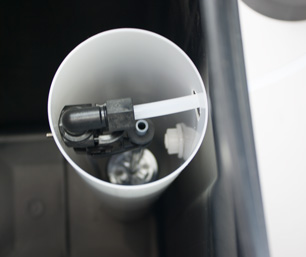 Fig. 4 — Brine tank viewed from above with cap removed.
Softener installation is pretty straightforward, but here are a few things you should know about installing your 5600 or 2510 softener.
These instructions assume that the installer has basic plumbing skills. Plumbing isn't addressed in the instructions below.
Follow these steps:
-
Pick a spot for the installation. Keep in mind what portion of the building's water you wish to soften. Also keep in mind that you need access to a drain and a 115-volt electrical source. Install only on the cold water line. Determine “In” and “Out” by observing the directional arrows on the softener's yoke or bypass.
-
Remove the control valve (turn counterclockwise) and load the mineral tank with resin using the provided funnel. If the riser (the white pipe) has no protective plug, cover it with a plastic bag or tape to prevent resin from going down the center of the tube. Pour in the resin, filling the tank only part way; free space is important to allow suitable backwashing of the resin.
When the resin is in the tank, screw the valve back in place. Be sure the o-ring makes a good seal. No tool is necessary, just screw it down snugly.
Important: Before pouring in the resin, be sure that the riser tube is pushed all the way to the bottom of the tank and that it does not ride up before the valve is reinstalled.
-
Connect the resin tank to the brine tank with the 3/8" tube provided. The tube connects the brining port of the softener with the horizontal brine tube inside the brine tank. See images in Figures 3 and 4.
Attach tube with plastic compression fitting. Hand tighten the nut. No wrench needed.
-
Now make the main drain connection. The softener's drain connection is made with the barbed fitting that comes out of the back of the valve Tape the treads with teflon tape, as shown. Push the 1/2" drain hose onto the barb and use a hose clamp to secure the connection. Connection at the drain end should be made according to your local plumbing code.
-
The barbed fitting in the wall of the brine tank should now be fitted with an overflow tube. This is a non-pressure line that provides a safety overflow in case the brine tank overfills. It's purpose is to take away water in case of an overflow, so position the end over a floor drain or any place that water won't do damage. (Remember that water from this drain won't flow uphill.)
-
When everything is in place and the resin is loaded in the tank, connect the unit to the home's water line.
-
Startup and Salt Tank Fill. Refer to the manufacturer's service manual for programming the valve and startup. (Some manuals cover more than one unit. Be sure you're reading about your unit. If in doubt, call us.)
Site Index
Filtration Systems
- Aeration for Iron & Sulfide
- Backwashing Filters
(whole house & well units)
- Chlorine & Chemical Injectors
- Countertop Water Filters
- Garden Hose Filters
- Reverse Osmosis, Residential
- Reverse Osmosis, Commercial
- Shower Filters
- Specialty Filters
- Ultraviolet Systems
- Undersink Filters
- Water Softeners
- Whole House Filters
Cartridges
Parts
- Replacement Parts
- Faucets
- Filter Media
- Fittings
- Housings
- O-rings
- Pumps
- Pura UV
- R.O. Parts
- R.O. Tanks
- R.O. Booster Pump
- VIQUA UV