Installing and Operating the 2510 Filox Filter
Here's a brief “everything you need to know” instruction for installing our Fleck 2510 Filox filters:
-
When the filter is in the place where it will be installed, load the Filox media into the tank. To do this, cover the hole in the center tube of the filter with tape or a plastic bag to keep media out. Then pour all the Filox media into the tank. Avoid breathing the dust from the Filox as you pour. No gravel underbed is needed with the Vortech tank. Just pour in the Filox. The loaded media will fill the tank only about 2/3 full. This is the correct amount.
-
Remove the protective cap or tape from the center tube, clean away the dust from the top of the tank, then screw the control valve onto the top of the tank, making sure that the center tube goes into the center hole in the bottom of the filter valve. It's like putting a cap on a bottle. No tools are needed, and don't use excessive force in tightening. Hand tight and snug is good enough. The valve's o-ring is pre-lubricated, so you shouldn't need to apply grease.
-
Attach the metal bypass valve to the back of the filter valve using the clips that are on the valve. In some cases, the bypass will already be installed on the valve. Refer to a picture in the Fleck manual if there are questions about placement. Again, don't over tighten. There will be a bit of up and down play in the installed bypass. This is normal. It's there to give the installer some room for error.
-
Attach the filter to the home plumbing using the 1" female fittings on the bypass valve. Note that the “In” port of the valve is on the left as you look at the filter from the back.
-
Connect the unit to an approved drain. On 8" and 9" filters, use the 1/2" drain line included. The drain line attaches to the barbed drain fitting on the unit.
For 10" and 12" units, a 3/4" drain must be added by the installer. A 3/4" garden hose will fit the drain cartridge installed on the unit, or standard PVC or copper fittings can be used.
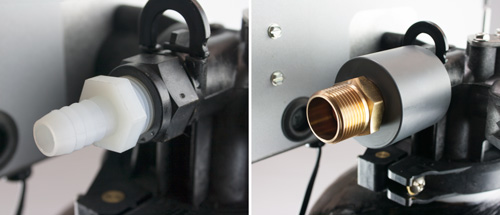
On smaller 8" and 9" units, the drain line attaches to a barbed fitting; on 10" and 12" units, the drain attaches to a cartridge like the one pictured.
-
Starting the Filter
There are many conflicting views on how startup of a backwashing filter should be done. Here's one way. It's simple and normally works well for this filter:
-
When the unit is connected, with the control valve and the bypass valve in the Service position, open a faucet downstream and turn on the inlet valve about one-third open to allow water to flow into the filter very slowly. At this rate, it will take a few minutes for the filter tank to fill. Check for leaks.
-
When the tank is full of water, you can either turn off the inlet water and allow the media to soak for a few minutes before putting it in service (this is best), or continue to run water very slowly, allowing the water to drain through your open faucet. (Many media manufacturers recommend a 24-hour soak before putting the filter in service. We've found that this is usually unnecessary, but it's best to avoid high volume use for the first day or so.) Allow the filter to rinse for at least ten minutes through the open faucet, gradually increasing the inlet volume, then close the faucet and the filter is in service.
As an alternative method, you can place the filter valve in bypass position, start the water slowly into the unit and allow it to rinse to drain for ten or fifteen minutes. Keep the flow slow to avoid media loss.
-
-
The control valve was programmed before shipping to backwash each night. Check to see that all twelve pins are pulled out on the skipper wheel — this will provide a backwash every night. If alternate programming is desired, push in pins for days you do not want a backwash, but we caution that with iron filters using Filox, every day backwash is preferred unless water usage and/or iron content are very low.
When using the Fleck manual enclosed, keep in mind that most of the information pertains to water softeners. What you have is a filter, not a water softener. The Fleck instructions have little specific information about filters, but keep the manual as a source of information in the event that you need parts for the valve.
After the filter is installed, the valve is pre-programmed and needs no alteration. All you need to do is set the time of day as per instructions in the manual, plug the valve in, be sure it's in the service position, then forget it. Operation is completely automatic from that point.
Site Index
Filtration Systems
- Aeration for Iron & Sulfide
- Backwashing Filters
(whole house & well units)
- Chlorine & Chemical Injectors
- Countertop Water Filters
- Garden Hose Filters
- Reverse Osmosis, Residential
- Reverse Osmosis, Commercial
- Shower Filters
- Specialty Filters
- Ultraviolet Systems
- Undersink Filters
- Water Softeners
- Whole House Filters
Cartridges
Parts
- Replacement Parts
- Faucets
- Filter Media
- Fittings
- Housings
- O-rings
- Pumps
- Pura UV
- R.O. Parts
- R.O. Tanks
- R.O. Booster Pump
- VIQUA UV