Basic Annual Service for a
Q Series Reverse Osmosis Unit
This is a step-by-step process. You don't have to follow this exact order, but it will be easier if you do. The instructions below are specific to our basic 3- or 4-Stage Q Series systems. If your unit is slightly different, you may have to improvise or call for instructions.
-
First, check the TDS (Total Dissolved Solids) level of the unit if you have a tester. This is a test of the reverse osmosis membrane, not of the carbon filters. It measures dissolved solids in parts per million (which is the same as milligrams per liter). The unit's product water should be about 1/10 the TDS of the tap water. For example, if your tap water has 500 ppm total dissolve solids, your RO water should be at 50 or lower.
If you don't have a tester, take a guess. If the water tastes good, the membrane is probably OK. Membrane life depends on lots of variables, but a good RO membrane should last from three to five years.
-
Turn off the inlet water at the inlet valve to the unit. Turn off the tank valve at the top of the storage tank. Open the ledge faucet and leave it open during the entire service procedure. If no water comes from the faucet, the unit is turned off and it's safe to replace the cartridges.
-
If you're using one of our “Recycle” Cartridge Packs:
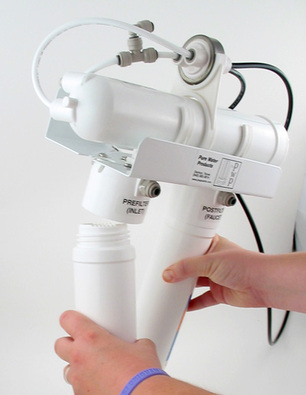
For a 3 Stage Unit, replacing one cartridge: Looking at the unit from the front, remove the prefilter (on the left) and discard it. Move the postfilter to the prefilter position. Put your new cartridge in the postfilter position.
For a 4 Stage Unit, replacing two cartridges: Looking at the unit from the front, remove the left (prefilter carbon) and center (prefilter sediment) cartridges. Move the remaining cartridge from the far right to the far left. Put a new sediment filter (Q5605) into the center position and a new coconut shell carbon GAC (Q 5640) into the right position.
If you're working without a “Recycle” Cartridge Pack:
Just remove the old cartridges, remembering the order they were in. The cartridges will screw off of the caps easily. Replace with the new cartridges.
-
Go on to step 5 if you're not replacing the membrane.
To replace the membrane:
-
Remove the tube that enters the cap end of the membrane housing by pressing in on the small ring (the “collet”) of the fitting and pulling out the tube. Unscrew the cap, then remove and discard the old membrane.
-
Open the replacement membrane's sealed bag at the end opposite the stem with two black o-rings. Then, avoiding touching the membrane with your hands, grasp the membrane with pliers and pull it from the bag.
-
Holding the membrane with pliers, put it under a water tap. This isn't to rinse the membrane but to wet the o-rings and the rear skirt for lubrication so it will slide easily into the housing. Now, slide it into the membrane housing, still holding it with pliers. It needs to slip into a slot at the end of the housing. The best way is to push it to an easy stopping place, then twist and push with the pliers. You'll feel it slide into its slot.
-
Replace the cap and tube.
-
-
When the cartridges have been replaced, open the inlet valve part way and let water slowly enter the unit. Check for leaks. If everything seems OK, open the inlet valve completely. It's normal to hear lots of gurgling and air escaping down the drain.
Next, with the ledge faucet open, open the valve on top of the tank. After a moment, water will come from the open faucet. It's normal for black particles (called carbon fines) to come out of the faucet. Let the tank drain completely — this may take some time. It will finally become a fast drip or a small stream. This is the rate of water production through the membrane.
Tip: Don't empty the storage tank before you change the cartridges. This step is necessary to rinse the new postfilter.
-
Now, with the ledge faucet still open, service the storage tank:
Start by attaching a small hand pump like a bicycle pump to the air valve on the tank. (On our standard tank, the air valve is on the side and covered by a blue cap. For other tanks, placement will vary. You'll have look for it.) With the faucet still open, pump air slowly into the tank. A larger stream of water will start to leave the tank through the open ledge faucet.
Continue to pump air into the tank slowly and steadily until all water is out of it and the stream returns to the small stream you saw before you started putting air in the tank. Try to leave about 7 pounds of pressure in the empty tank. If you don't have a low-pressure gauge, guess. The exact amount isn't that critical. Don't over-air the tank, however, because you won't be gaining more pressure; you'll just be leaving less room in the tank for water.
Tip: You don't have to service the tank every time you change the cartridges, but it's a good idea to do it. If you never replenish the air in the tank, you'll eventually reach a point where you don't have enough water. (There will be water in the tank, but it won't come out.) The best practice is to service the tank each time you change cartridges.
When the tank is aired, close the faucet and let the unit refill. You're through. You'll have enough water to use in a few minutes, but it may take a couple of hours for the tank to fill completely.
Site Index
Filtration Systems
- Aeration for Iron & Sulfide
- Backwashing Filters
(whole house & well units)
- Chlorine & Chemical Injectors
- Countertop Water Filters
- Emergency Filters
- Garden Hose Filters
- Reverse Osmosis, Residential
- Reverse Osmosis, Commercial
- Shower Filters
- Specialty Filters
- Ultraviolet Systems
- Undersink Filters
- Water Softeners
- Whole House Filters
Cartridges
Parts
- Replacement Parts
- Faucets
- Filter Media
- Fittings
- Housings
- O-rings
- Pumps
- Pura UV
- R.O. Parts
- R.O. Tanks
- R.O. Booster Pump
- VIQUA UV