Installing the No-Backwash
Whole House Carbon Filter
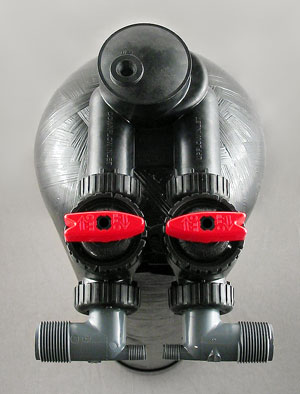
View from the top of unit with bypass installed. The elbows can point any way that's convenient for the installer. Water enters this filter from the right side.
Installation
This is a simple installation. No drain connection, no electrical connection, and no complicated setup. The water goes in one side and out the other.
Choosing a Location
Install the filter at a place where it will filter all water coming into the home. It must be protected from freezing and direct sunlight, and needs a solid, level footing. Keep in mind that it will need to be disconnected and refilled with carbon in a few years.
Loading the Carbon
The advanced Vortech tank used with this filter requires no gravel underbedding, so all you have to do is pour in the granular filter carbon.
-
Cover the hole in the riser tube (the 1" pipe that comes out of the middle of the tank's mouth) with tape or a small plastic bag to prevent carbon from going inside the tube during filling.
-
Using the funnel provided, pour the carbon into the tank. Avoid breathing the carbon dust while filling the tank. The carbon will fill the tank about 2/3 full.
-
When the tank is filled, remove the protective tape or bag from the riser tube, and screw the filter head onto the tank. The riser tube goes though the center of the basket. You may have to push down to get the head to drop to the threads. Tighten until it's snug, but don't over-tighten. No tools are needed.
If there is no upper basket attached to the bottom of the inlet valve, do not install the unit!
Setup and Initial Rinse
-
Attach the inlet of the filter (the connection on the right) to your plumbing using standard, code-approved methods. The filter ends in a male 1" pipe thread, so you may have to make some adaptation. If you hook the inlet and outlet backward, it won't work right.
Important: Connect only the inlet side of the filter to the house plumbing initially.
-
After the filter is installed to the incoming water, attach the adapter provided to the downstream side and attach a garden hose to the adapter. Put the end of the garden hose outside, or run it to a drain. Then, turn on the inlet water to the filter so that water flows into the filter slowly, no faster than half speed. Allow the filter to fill slowly. Air will escape from the hose and eventually water, probably cloudy and dark with “carbon fines,” will begin to come out of the hose. Let the filter rinse at half speed for four or five minutes, then open the inlet water all the way.
-
When you feel that the carbon has rinsed sufficiently — usually 4 or 5 minutes more — close the faucet. Remove the adapter from the outlet of the filter and connect the outlet of the filter to your house plumbing. The filter is now installed and the water is ready to use.
For a time you may experience cloudy water (from air trapped in the lines) and air pockets. This is normal and will soon go away.
Site Index
Filtration Systems
- Aeration for Iron & Sulfide
- Backwashing Filters
(whole house & well units)
- Chlorine & Chemical Injectors
- Countertop Water Filters
- Emergency Filters
- Garden Hose Filters
- Reverse Osmosis, Residential
- Reverse Osmosis, Commercial
- Shower Filters
- Specialty Filters
- Ultraviolet Systems
- Undersink Filters
- Water Softeners
- Whole House Filters
Cartridges
Parts
- Replacement Parts
- Faucets
- Filter Media
- Fittings
- Housings
- O-rings
- Pumps
- Pura UV
- R.O. Parts
- R.O. Tanks
- R.O. Booster Pump
- VIQUA UV