Installing Backwashing Filters
Large backwashing filters are simple devices. They consist of a tank filled with a filter medium, a tube called a riser inserted into the tank, and a control valve to manage the flow of water through the filter.
Most of Pure Water Products' smaller residential filters use the Fleck 5600 SXT control valve—a simple, time-proven tough performer that will give many years of trouble-free service under normal conditions. It's easy to install and program, and easy to repair if a problem comes up.
Most backwashing filters for treating sediment, iron, or chlorine and other chemicals differ only in the filter media they hold. Filters for neutralizing pH of acidic waters are a bit different and will be given special attention. These instructions apply to all filters containing standard filter media such as carbon, Centaur, Birm, Filter Ag, Zeolite, Calcite, or Filox-R.
Most Pure Water Products 5600 backwashing filters feature a premium Vortech mineral tank that does not require a gravel underbed. However, if you have a traditional mineral tank, you will need to install the included gravel underbed before loading filter media.
Be sure you have the whole filter before you start.
You should have:
-
A mineral tank, either 8" X 44", 9" X 48", 10" X 54", or 12" X 52". There are two types of tanks. Here's how to tell the difference:
-
The standard tank has a removable “riser” tube. This is a 1.05" tube cut to the approximate length of your tank.
-
The Vortech tank also has a riser tube, but it is locked tight into the bottom of the tank. If you can pull the riser tube out, you have a standard tank.
-
-
A Fleck 5600 SXT Control Valve. The valve should be pre-programmed and have a drain line flow control (DLFC) pre-installed. A tag attached to the valve near the drain connection will be marked, in gallons per minute, the size of the flow control button installed in your unit. Flow controls for most filters in this category are 5.0 or 7.0 gallons-per-minute. (This is what determines how much water per minute is used during backwash. It's an essential part, so contact us if you're in doubt that the flow control was installed.)
-
Filter media. For an 8" diameter filter, there should be 3/4 of a cubic foot. For a 9 filter, there should be one cubic foot. For a 10" filter, there should be 1.5 cubic feet. For a 12" filter, there should be 2 cubic feet.
-
If you have a standard tank, there should be a bag of gravel. This is the underbed that the filter media sits on.
-
A media funnel to load the filter medium, and a small roll of 1/2" drain tubing.
-
A yoke or a bypass valve to connect the control valve to your plumbing. The yoke or bypass attaches to the back of the control valve with clips held by a single screw.
Loading and Installing the Filter
For city installations, install the filter at a point of entry so that all water that you wish to filter will pass through it. For wells, the preferred installation spot is in the main water line after the pressure tank. Filters almost always go before softeners and ultraviolet systems. Please call us if you're in doubt.
The unit must have access to a drain, so keep that in mind when choosing an installation spot. The shorter and more direct the run to the drain, the better.
When selecting a place for the filter, keep in mind that you're eventually going to have to change the filter medium. Put it in a place where it will be easy to service. The tank is light now, but it won't be when it's full of water.
Here's how you load the filter:
-
When the filter is in the area where you plan to install it, begin by loading the gravel (if any) into the tank:
-
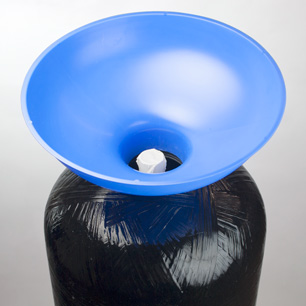
First, if the riser tube does not have a temporary plastic plug installed in the top, cover the top of the riser tube with a plastic bag, or fashion a plug so that gravel won't be poured into the center of the tube.
-
Use the softener funnel and pour in the gravel. Be sure that the riser tube stays all the way down. It should be approximately flush with the top of the tank, as in the pictures. When the gravel is in the tank, the bottom of the riser will be buried in a bed of gravel and it should stay in place.
-
-
Next, using the funnel provided, pour the filter media into the tank.
Avoid breathing the dust that comes off the media as you fill the tank.
It's usually easier for two people to do this job—one to hold the funnel, one to pour in the media. Pour in all the media. It will not fill the tank—it isn't supposed to. The unfilled tank space above the media bed, called “freeboard”, is essential for proper backwashing of the media.
Installing the Filter Valve
-
5600 filters have two O-rings. One is inside the center hole in the bottom of the valve. It makes a seal when the riser tube is inserted past it. The other O-ring fits in a lip located just above the threads that screw into the tank. If the two O-rings on the valve are not lubricated, put a small amount of silicone lubricant on each.
-
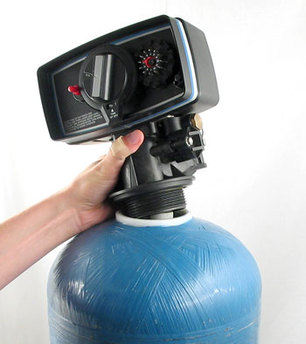
Screw the filter valve onto the tank. (Don't forget to remove the temporary plug from the end of the riser tube.) The tube slips into the center hole at the bottom of the valve. No tools are needed, just hand tighten the valve until it's snug.
-
When the valve is installed, set the filter in place and install it to your home's plumbing according to your local plumbing code. “In” and “Out” are indicated on the valve body. Be sure you get it right. Looking from behind, water enters the 5600 valve from the left.
-
Attach a drain hose to the barbed drain fitting that comes out of the back of the control valve. Secure it with a hose clamp. Attach to a drain according to local plumbing code, or if convenient, place the end of the drain line so that it can drain onto the ground. Keep in mind that during the backwash cycle the filter will run several gallons of water out the drain line.
When the yoke or bypass valve is clamped onto the valve, it may feel loose. This is not a problem, the looseness is engineered into the system to provide the installer some “wiggle room”. If your incoming pipe is a little too high or low, the by-pass valve or yoke will move up or down to accommodate.
Start-Up
When the installation is complete, you can start the filter:
-
If there is a bypass valve on your unit, place it in the “Service” position.
-
Filters with SXT digital valve: Plug the control valve into power outlet. Display should flash between “time of day” display, and &mdqh;day override— display (number of days until next backwash.) Press and hold the cycle button until filter enters backwash mode and the display reads "BW" along with a timer count down. Unplug control valve from power outlet to hold valve in backwash position.
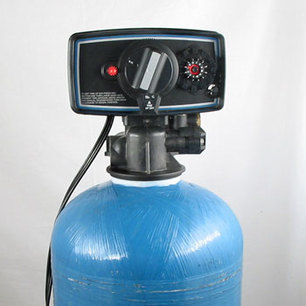
Filters with mechanical timer valve: Do not plug the control valve into an electrical outlet. Manually advance the large central knob on the valve face clockwise from the “Service” position, through the “Start Backwash” and the “Rinse” positions to the “Backwash” position. That's straight up, twelve o'clock.
-
Next, open the inlet valve partially to allow water to fill the filter slowly. Slowly is the key word. A slow initial fill prevents the loss of media via the drain line.
It may take several minutes before water begins to flow from the drain line. When water starts issuing from the drain line, visually check to make sure you aren't blowing out filter medium. If medium is coming from the drain, cut back your flow rate to avoid further media loss. (Hissing and gurgling are normal. It's air being purged from the tank.)
Allow water to flow slowly to drain for a few minutes, then gradually open your inlet valve until you have a full flow through the backwash tube. When the water runs clear (meaning that the filter medium is well rinsed), bring the valve back to “service position”:
- For mechanical valves, move the large dial on the valve clockwise to “In Service”.
- For digital valves, plug the valve into a power outlet and allow it to complete cycles to return to service position.
-
At this point you should open a downstream faucet part way, then gradually increase flow and let water issue until air is purged from the filter and the water line. You may need to repeat this with additional faucets.
When the air is purged from the lines, the filter is now installed and in service. With some media, especially carbon, you may experience cloudy water for several hours due to the large amount of air given off by the startup of the filter. This will go away and it is not a health issue. (If cloudy water standing in a glass clears from bottom to top, the cloudiness is caused by air.)
Special Note for Zeolite sediment filters: Zeolite media is sometimes problematic on startup. It is recommended that after the initial slow fill of the tank you bypass the filter and allow for a full 24-hour soak. This will prevent loss of medium in the initial stages of operation. This is the manufacturer's recommendation, but not everyone follows it. Proceed with caution to prevent media loss.
Programming Control Valve
Control valves are pre-programmed prior to shipping. Refer to the included customer setup sheet for your valve's preset programming.
Programming Digital SXT Valve
-
Plug in the control valve to a standard 115 volt outlet. There's no on/off switch on the valve. When it's plugged in, the valve display should alternate between “time of day” display and “day override” display (number of days until next backwash.)
-
To enter master programming mode, press and hold the up or down arrows to set the time to 12:01PM. Press the “cycle” button to confirm this time setting. Now, press and hold both the up and down arrow buttons for 5 seconds until the valve display reads “DF gal”.
-
Use the up and down arrows to adjust the setting, and press the cycle button to confirm and advance to next programming value.
(Refer to included "programming SXT" sheet, or SXT service manual for programming options and values. Please contact us if you have questions during programming.)
-
After advancing through all available programming options, the valve will return to time of day display.
Programming Mechanical Timer Valve
-
Plug in the control valve to a standard 115 volt outlet. There's no on/off switch on the valve. When it's plugged in, it's running. If you have good ears, you can hear the motor purring.
-
This is the world's simplest filter valve. You only have to set the time of day and select the backwash frequency.
To set the time, push in the red knob on the left of the large central knob. This releases the large wheel and lets you rotate it to set the time. Set the time to the actual time in the “Time of Day” window at the bottom/center of the wheel. It doesn't have to be exact, and you can set it wrong if it's to your advantage. The filter is pre-set to backwash in the wee hours of the morning when it won't inconvenience you. However, if, for example, you're a day sleeper and prefer that it do its backwash at 2:00 pm rather than 2:00 am, set the filter's clock wrong to accommodate your schedule.
-
Next, choose the backwash schedule with the wheel on your right on the valve face. Select a day for backwashing simply by pushing the small metal pins outward from the center. In other words, if you want the filter to backwash every second day, push out the pins for numbers 2, 4, 6, 8, 10, and 12. If you want the filter to backwash every third day, push out the pins for numbers 3, 6, 9, and 12.
There's no fixed rule on how often the filter should be backwashed. It depends on the situation, and you can determine it yourself through experimentation. For example, with an iron filter you might try every second day, but if iron begins to appear in the water, change to every day. (The manufacturer insists that Filox should backwash every day.) If you have a carbon or Centaur dechlorination filter running on clean city water, every 12th day may be plenty. There's some guessing involved, but you'll discover what works best in your situation. When in doubt, too often is better than too infrequently.
Site Index
Filtration Systems
- Aeration for Iron & Sulfide
- Backwashing Filters
(whole house & well units)
- Chlorine & Chemical Injectors
- Countertop Water Filters
- Emergency Filters
- Garden Hose Filters
- Reverse Osmosis, Residential
- Reverse Osmosis, Commercial
- Shower Filters
- Specialty Filters
- Ultraviolet Systems
- Undersink Filters
- Water Softeners
- Whole House Filters
Cartridges
Parts
- Replacement Parts
- Faucets
- Filter Media
- Fittings
- Housings
- O-rings
- Pumps
- Pura UV
- R.O. Parts
- R.O. Tanks
- R.O. Booster Pump
- VIQUA UV